
Algorithms that primarily use the cores from graphics cards can occasionally consume additional wattage for memory when it’s not needed. With cryptocurrency mining, efficiency is one of the most critical factors in profitability. This short guide will help you squeeze additional efficiency from your graphics cards while mining.
Table of Contents
What is Dynamic Power Management (DPM)?
Dynamic Power Management, or DPM, is a feature found on modern graphics cards from AMD and Nvidia to allow users to reduce power consumption on graphics cards. Use cases would include prolonging battery life on a laptop or just general energy conservation.
Fortunately for miners, we can tap into this system to help reduce the power consumption of our graphics cards when it’s not needed. Nvidia doesn’t yet offer the option in Linux to control memory separately from the core so we’ll focus on AMD in this article.
What Algorithms or Coins can Take Advantage of DPM?
The example below sets the DPM memory clock to mode 0. Essentially, an algorithm that does not rely on memory could take advantage of this. Recently, this has been tested on Kaspa, which uses kHeavyhash, with savings of about 20-25 watts per card.
What Cards have been Tested?
We’ve tested the AMD 6000 Series cards with this tweak (6600, 6600 XT, 6700 XT, 6800 XT, 6900 XT). Others may benefit from this, but we haven’t confirmed stability.
Automating Our Way to Better Efficiency
We’re going to use HiveOS as we go through this guide. However, you can use any Linux distro you like.
The Shell Script
We will automate the process, so it’s only natural that we write a simple shell script to accomplish this. If you’re new to Linux, do not fear. You don’t need a deep understanding to make this work. In simple terms, this script sets the DPM mode for the memory clock to 0. This is the lowest power mode available for the memory clock.
Open a remote shell in HiveOS. From there, type “nano /home/user/amdinit.sh” to start a new file. Once nano is open, copy the script below and paste it into the editor.
#!/usr/bin/env bash
exec 1> >(logger -s -t $(basename $0)) 2>&1
echo -e "Locating AMD devices"
# motd | grep Radeon | awk -F "[ ]" '{n++} END {printf("%d cards found\n", n)}'
var=$(motd | grep Radeon | awk -F "[ ]" '{n++} END {printf("%d", n)}')
if [ $var > 0 ]; then
  echo -e "Found $var AMD devices"

  echo -e "Setting DPM memory state"
  motd | grep Radeon | awk -F "[ ]" '{print "echo 0 > /sys/bus/pci/devices/0000:"$3 "/pp_dpm_mclk" }' | bash;

else
  echo -e "No AMD devices were found"
fi

exit 0
Press CTRL+X and press Y to confirm the file name.
In order to be able to execute the script, we need to change the permissions. At the prompt, type “chmod +x /home/user/amdinit.sh”.
Now let’s test the script. At the prompt, type “/home/user/amdinit.sh”. You should see output similar to what’s below.

Additionally, you will see the idle power drop at least 20 watts. These savings will hold true even once you start your miner.
Repeat the steps above on each mining rig you want to run the script on.
Scheduling the Script
When the mining rig restarts or if the mining software restarts, the DPM setting will be reverted. Even without a restart of the miner, we’ve observed this being reset under normal operation. Fortunately, with HiveOS we can leverage schedules.
Creating Tags
To use a schedule in HiveOS, you need to first tag your mining rigs. We’re going to add the tag “AMD” to the rigs, but you can name the tag whatever you like.
- Open your worker on the HiveOS web GUI
- Click the Settings tab
- In the Tags box, add the “AMD” tag
- Click “Update Worker”

Repeat this for each worker you’re going to run this script on.
Creating the Schedule
Schedules are created at the farm level in HiveOS.
- At the farm level in HiveOS, click on the Schedules tab
- Click the “Add Event” button
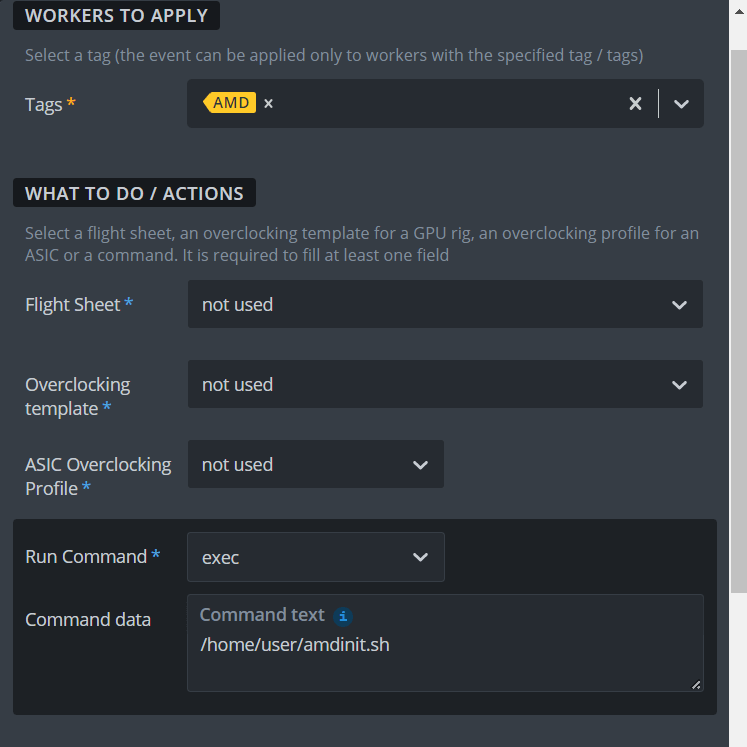
- In the Tags box, type “AMD” and pick the tag you created
- In the Run Command dropdown, choose exec
- For the Command Text type “/home/user/amdinit.sh”
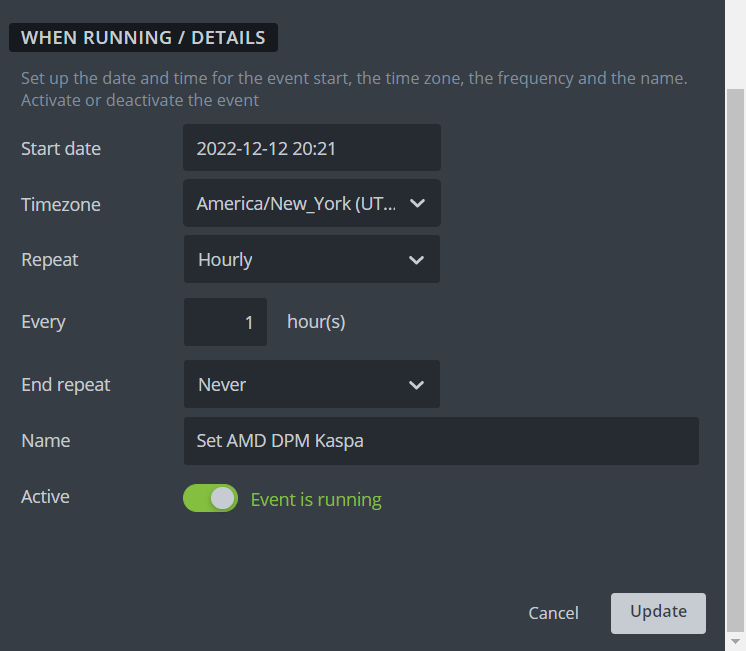
- Choose Hourly from the Repeat dropdown box
- Set Every to 1
- Enter a name for the schedule and click the “Create” button
If everything went as planned, you’ll start seeing a successful execution of your script. If you open a worker, you will see each hourly execution of the script.

Conclusion
Below are the results of two AMD 6700XT GPUs mining Kaspa. Notice the overclock settings are the same, but the wattage is lower on GPU 0. GPU 0 has the above DPM memory mode set to 0.

Be aware that manually setting any DPM parameters can lead to instability. Certain DPM options do not work with certain algorithms/coins. For example, using the above memory setting on Ethash coins such as Ethereum Classic would result in poor performance as memory performance is critical.