Operating a cryptocurrency node helps to provide storage for blockchain data and in some cases, offers additional services to blockchain users. As a node operator, you may also be compensated in the chosen token for running the node. However, operating a node is not without risk.
Table of Contents
Hosting a Crypto Node with a Virtual Private Server (VPS)
VPS hosting providers help offload the need for you to obtain or use your existing computer hardware. There are many VPS providers to choose from. You will want to select a provider that has services in the region you are looking to host your node. This is less important when running a node where you’re simply storing blockchain data, such as Bitcoin or Litecoin. It is essential when running nodes that provide services. Examples would be Presearch, Streamr, and Flux.
Below are some recommended hosting providers that we have personally vetted.
| VPS Provider | Cost | Description |
|---|---|---|
| Digital Ocean | $$$ | Digital Ocean is a well-known hosting provider that offers premium hosting services. They have excellent support and a wide range of VPS (and other) service offerings. They are a leader in this space you will pay a little more because of this. |
| Rack Nerd | $ | Rack Nerd offers everything from web hosting to VPS hosting to dedicated servers. Their signups are very fast and their support is very good. Rack Nerd is one of the most cost-effective options that actually performs as you would expect. Typically, this is who we leverage for node hosting. |
Once you’ve selected your host, you’ll need to choose and deploy your Linux VPS. We’ll cover the more common flavors of Linux – Ubuntu and CentOS in this article. However, most of what applies to each of these two will apply to the other variants as well.
You can, of course, host your crypto node with your own hardware at your home or office. When running a Linux VM on your own hardware much of this article will still apply.
Guarding against Brute Force Attacks
When you leverage a VPS provider, you will undoubtedly be reusing an IP address. While this is common practice, it does mean that this “new to you” VPS has already been seen on the Internet. Even if you were to end up with a new, unseen IP address the bad actors are constantly scanning looking for new devices.
Brute force attacks or the constant guessing of login credentials is very common. It’s one of the easiest attacks to conduct and requires little to no manual intervention. You can guard against this with a time-tested program named fail2ban.
Fail2ban leverages firewall rules and any criteria you specify to help block repeat offenders from getting into your server. It’s free and very easy to set up.
Configuring fail2ban to Protect your Server
We’re going to install the fail2ban program and then quickly configure the SSH settings to thwart the bad guys. All of these commands are done at the prompt of your VPS once you’ve signed in and require root access.
Install fail2ban and enable the service.
CentOS
The first portion of this command ensures the epel-release repository is installed. This is required in order to obtain fail2ban.
sudo yum install epel-release -y && sudo yum update -y &&
sudo yum install fail2ban -y && sudo systemctl enable fail2ban
Ubuntu
sudo apt install fail2ban && sudo systemctl enable fail2ban
Once we have fail2ban installed, we need to set up a basic configuration file to tell it what to do. The steps below apply to both CentOS and Ubuntu.
sudo vi /etc/fail2ban/jail.local
By default, this file does not exist. Once in vi, press the insert key and paste the following contents:
[DEFAULT]
# Ban hosts for one hour:
bantime = 3600

# Override /etc/fail2ban/jail.d/00-firewalld.conf:
banaction = iptables-multiport

[sshd]
enabled = true
Press the escape key followed by :wq and enter to save and exit. Now let’s restart the service.
sudo systemctl restart fail2ban
Finally, let’s make sure it’s working.
sudo fail2ban-client status
Updating your Node’s Operating System Automatically
It’s no secret that vulnerabilities are discovered nearly every day. While Linux used to be mostly immune to this in years past, that’s no longer the case. But who wants to constantly log into their fleet of crypto nodes to apply patches on a regular basis? Fear not, we can automate this and save some sanity.
CentOS
Yum-cron will take care of the heavy lifting for us. Let’s walk through the config. We’ll assume you already install epel-release above.
sudo yum install yum-cron -y && sudo systemctl enable yum-cron
Let’s open the configuration file. This file already exists, but we need to make a couple of changes for the updates to work.
sudo vi /etc/yum/yum-cron.conf
In this file, we need to make one change. Search for “download_updates = “. Press the insert key and change the value to yes. This change is enough to ensure your system will update on a regular basis. You need to be aware that with the default options, the operating system version itself can be upgraded. In most cases, this is ok. In some instances, this can break nodes. If this is a concern, change “update_cmd = default” to “update_cmd = security”.
Press the escape key followed by :wq and enter to save and exit. Now let’s restart the service.
sudo systemctl restart yum-cron
Ubuntu
Automatic updates in Ubuntu are handled slightly differently. Let’s ensure the unattended-upgrades package is installed.
sudo apt install unattended-upgrades -y
Now, let’s configure the server to apply updates automatically.
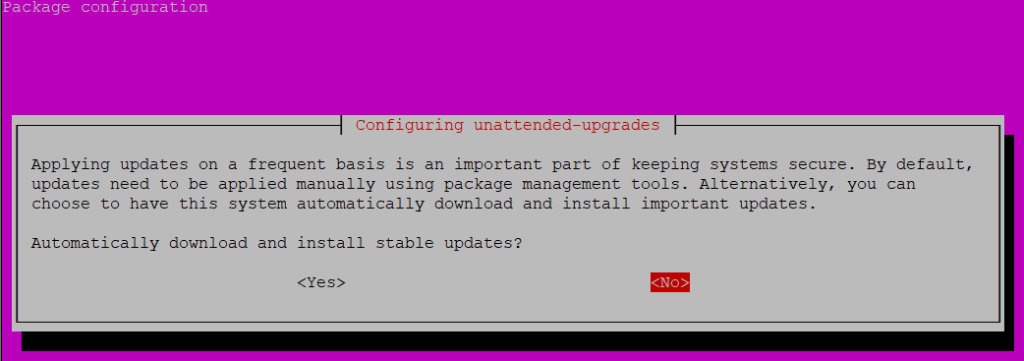
sudo dpkg-reconfigure -plow unattended-upgrades
You’ll be presented with a bright pink dialog asking you to confirm your choice of enabling automatic updates. Choose yes and you’re done.
A Note about SELinux and AppArmor
SELinux (CentOS) and AppArmor (Ubuntu) offer extended protection for your operating system. Both packages are installed by default. If you encounter permissions issues or issues with Docker containers executing, you may need to adjust the protection levels.
The other alternative when using Docker-based nodes such as Presearch or Streamr is to run the container with the “–privileged” command-line parameter.
Conclusion
Though this is not a guarantee you’re crypto node will never get hacked, these simple steps can help thwart many of the basic attacks.
Have more tips or suggestions? Find us on Twitter or drop us an email.